For a lot of you moms out there, doing something technical is SCARY.
For me to tell you that you CAN create your blog today, you probably won’t believe me.
My wife was in the same position but she created this website and a couple e-commerce websites, on her own.
Believe it or not, I was also in the same position. I just took action to learn it years ago so that is why I’m in the position to help you out today to teach you how to start a blog quickly.
Over the years, starting a blog has become tons easier. It was so complicated back then!
Before we start though, I want to clarify something.
When I say start a blog, I mean starting a real blog that you control and own. Not one of those blogs hosted on Tumblr, Blogspot nor WordPress.com.
Why? It’s because you do not control what happens to your content.
They can shut down tomorrow and just delete the content you’ve built up over the years and that would SUCK.
I know, I know, it’s free.
You can’t top something that’s free, but in this case, paying is actually the smarter choice.
Imagine all the time you put in to your content, building relationships in your comments area and sharing the post on social media.
Those will all be useless once they decide your stuff shouldn’t be on their site.
Want to know some other reasons?
- The built-in designs suck. You probably have 10 million other people using the exact same design. You’d want to self yourself apart, right?
- You can’t do much with the website structure and if you could, it’s pretty complicated.
- Someone can just report your site and it can disappear tomorrow.
- You are missing out on search engine traffic. People prefer to click on real domains and .com’s
- Brand building starts with your site. You want people to remember your brand easily.
- What if you host it with them (free blog sites) but just buy a domain name? You are still missing out on the things above. In a word = “limiting”
I’m sorry, your friends are wrong and they are probably satisfied with their blog right now, having readers such as their moms and spouses.
With those said, we can now focus on getting you started.
I will be updating this page if there are new changes but for the most part, the content of this post will hold up for years to come.
Warning 1
YOU have officially committed to start working on your website today. Not tomorrow.
Warning 2
You will need to take out your credit card because you will be spending some money BUT hear me out. I will break down the cost and show you why it’s smart and actually, really, really, really affordable.
Warning 3
I’m actually starting a new blog now just to prove the information on this page. This is the site. It’s blank and all now, but by the time you check back, it will be up and ready. It’ll be a pet project by me just to show you this works, that you can start a blog of your own. Whether you are starting a baby blog, a baking blog, a beauty blog, a blog about your life, a blog and making money, a blog as a business, a blog as a teenager or whatever…If I can do it, then so can you.
Keys to starting a blog?
For those that want to jump in:
Domain Name & Hosting | Setup | Design | Plugins | Traffic Strategies | Resources
HOLD ON!
Don’t close this page!
I know spending money or purchasing something online can be scary for some of you, but if you think about it, a lot of you already bought Groupon-type coupons online! This isn’t any different!
Stop putting it off and let’s get your blog or business online.
Let’s Get Started!
I’ve broken this down to simple steps so you can follow EVEN if you are pressed for time.
Give me 15 minutes of your time to get you started and get that skeleton of your blog up and running.
I promise, it’ll be EASY.
The Normal Route of Starting a Blog
You need to purchase your domain name (the domain name is the website URL, like LightOng.com) and spend for a monthly host.
A host is the server, it’s basically a computer connected to the internet where your files are stored so that your website is up 24/7.
My normal domain registrar is NameCheap. I love them to death.
My suggestion to you is to stay away from GoDaddy for new domains. I’ll be honest, their f’n expensive compared to NameCheap. Their hosting sucks as well. Please don’t bother.
This normal route will set you back at least $10 per year + another hundred plus for a shared host.
So around $150’ish onwards per year.
Not as expensive as you might have initially thought, right?
That’s around $13 a month. It’s nowhere near how much you spend on gas or even your cellphone bill.
For most of you here in the Philippines, your cellphone bill can easily go upwards of 1,000 pesos!
My Recommended Route for Starting a Blog

To make things easier, I’ve arranged a special coupon for you today so you can get:
– an above average shared server (because there are a ton of crappy services out there)
– a FREE domain name
So please take advantage of this because I never had this luxury back then when I started.
Step 1: Click this link
We recommend using JustHost for this tutorial.
Step 2: Choose your domain name
Enter a Name you’d like for your site (preferably a .com)
Once you’ve decided, proceed to the next step.
Step 3: Select your subscription duration.
Currently, they have 3 plans, which you can see in the picture below.
To lessen the confusion, if you plan to focus on just 1 site, pick the first option (Starter Package) on the left.
If you plan to add new websites in the future, then select the Plus Package in the middle. That’s it.
In this example, let’s pick the Starter Package.

We’ve arranged a promo with JustHost to give you a free domain. Click the link if you haven’t, so you’ll have that coupon automatically inserted.
Now, pick a domain name that you want for your blog.
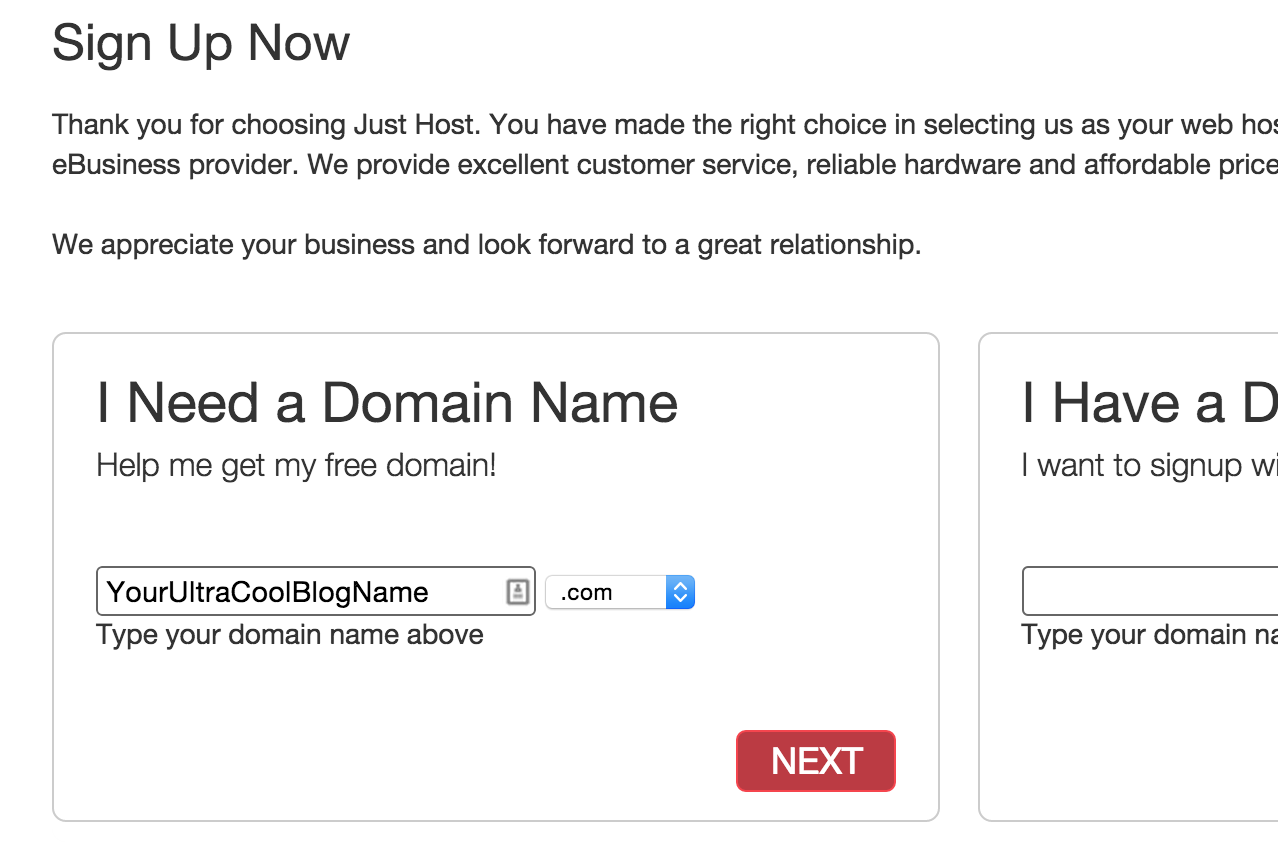
I only have a few tips for a domain name:
- Keep it short
- It should make sense
- Stick with a .com as much as possible
- Try to use a brand name that you can use consistently across all your accounts, including social media
I’ve tried $1 “promo” hosts in the past and I paid for it dearly. Ended up costing me more because I had to move the site.
I’ve used a ton of hosts over the years, from I have 5 BlueHost servers, DigitalOcean accounts and more!
I wanted to break all the barriers that would STOP YOU from getting that blog of yours up and running which is why I chose JustHost for this “starting a blog” tutorial.
JustHost just happens to be up to par with BlueHost in terms of performance and they are a bit more affordable. Perfect for the Moms Make Money series readers here on Lightong.com.
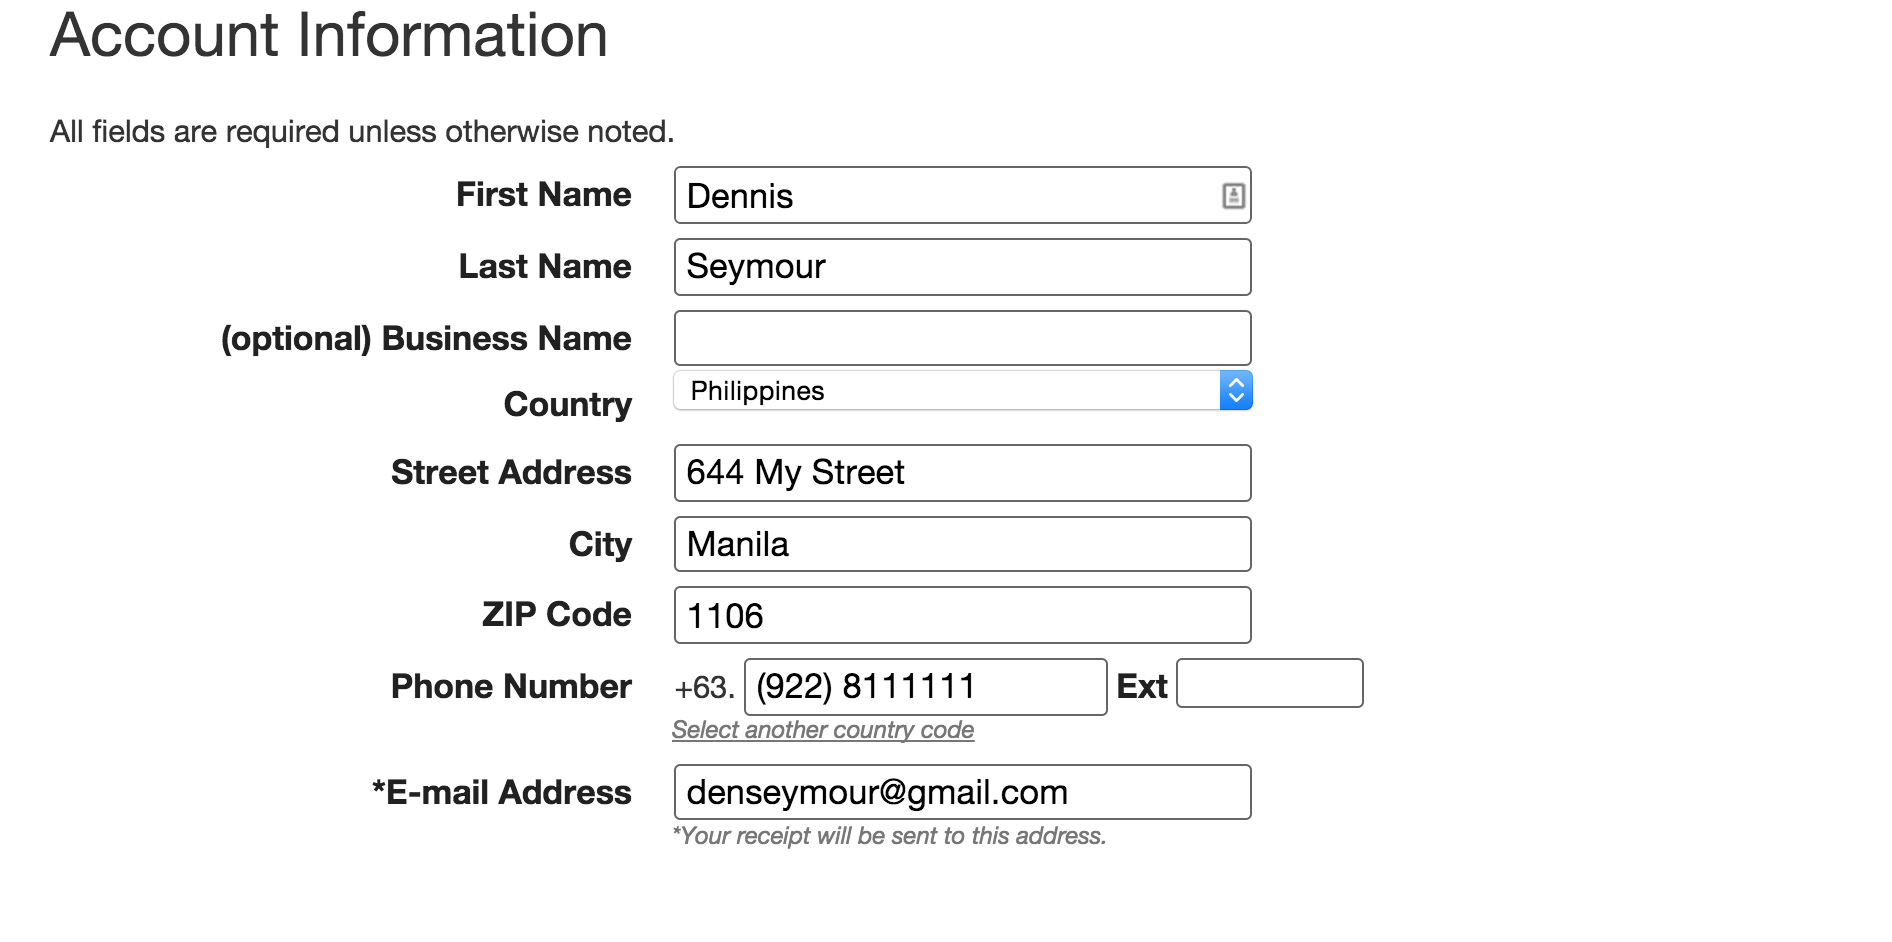
Now, start entering your details on the next page.
Pick a duration that you want to subscribe for. Obviously, it’ll be cheaper if they lock you up long term.
Not sure if you want to continue long term? Select 12 months. Comes out to $60 a year.

If you think your blog or business will be online for the long run, then you’d want to make sure you get the best price. Sign up for 36 months at $2.95/month. – That’s around $36 a year.

Those are the best deals I’ve seen out there.
Step 4: Uncheck everything so NO extra charges are made
For all the companies and hosts that you buy domains from, be sure to read all the checkboxes before you click on them to add them to your bill.
In most cases, these are just minor add-ons that you can live without. I do not want you to spend extra on something that you can get for free with some tweaks once you have your site up and running.
I would only recommend one when you are in that position, which is Domain Privacy as I like to keep my domains private but it’s not required.
In this case, just uncheck everything.
Step 5: Check Out.
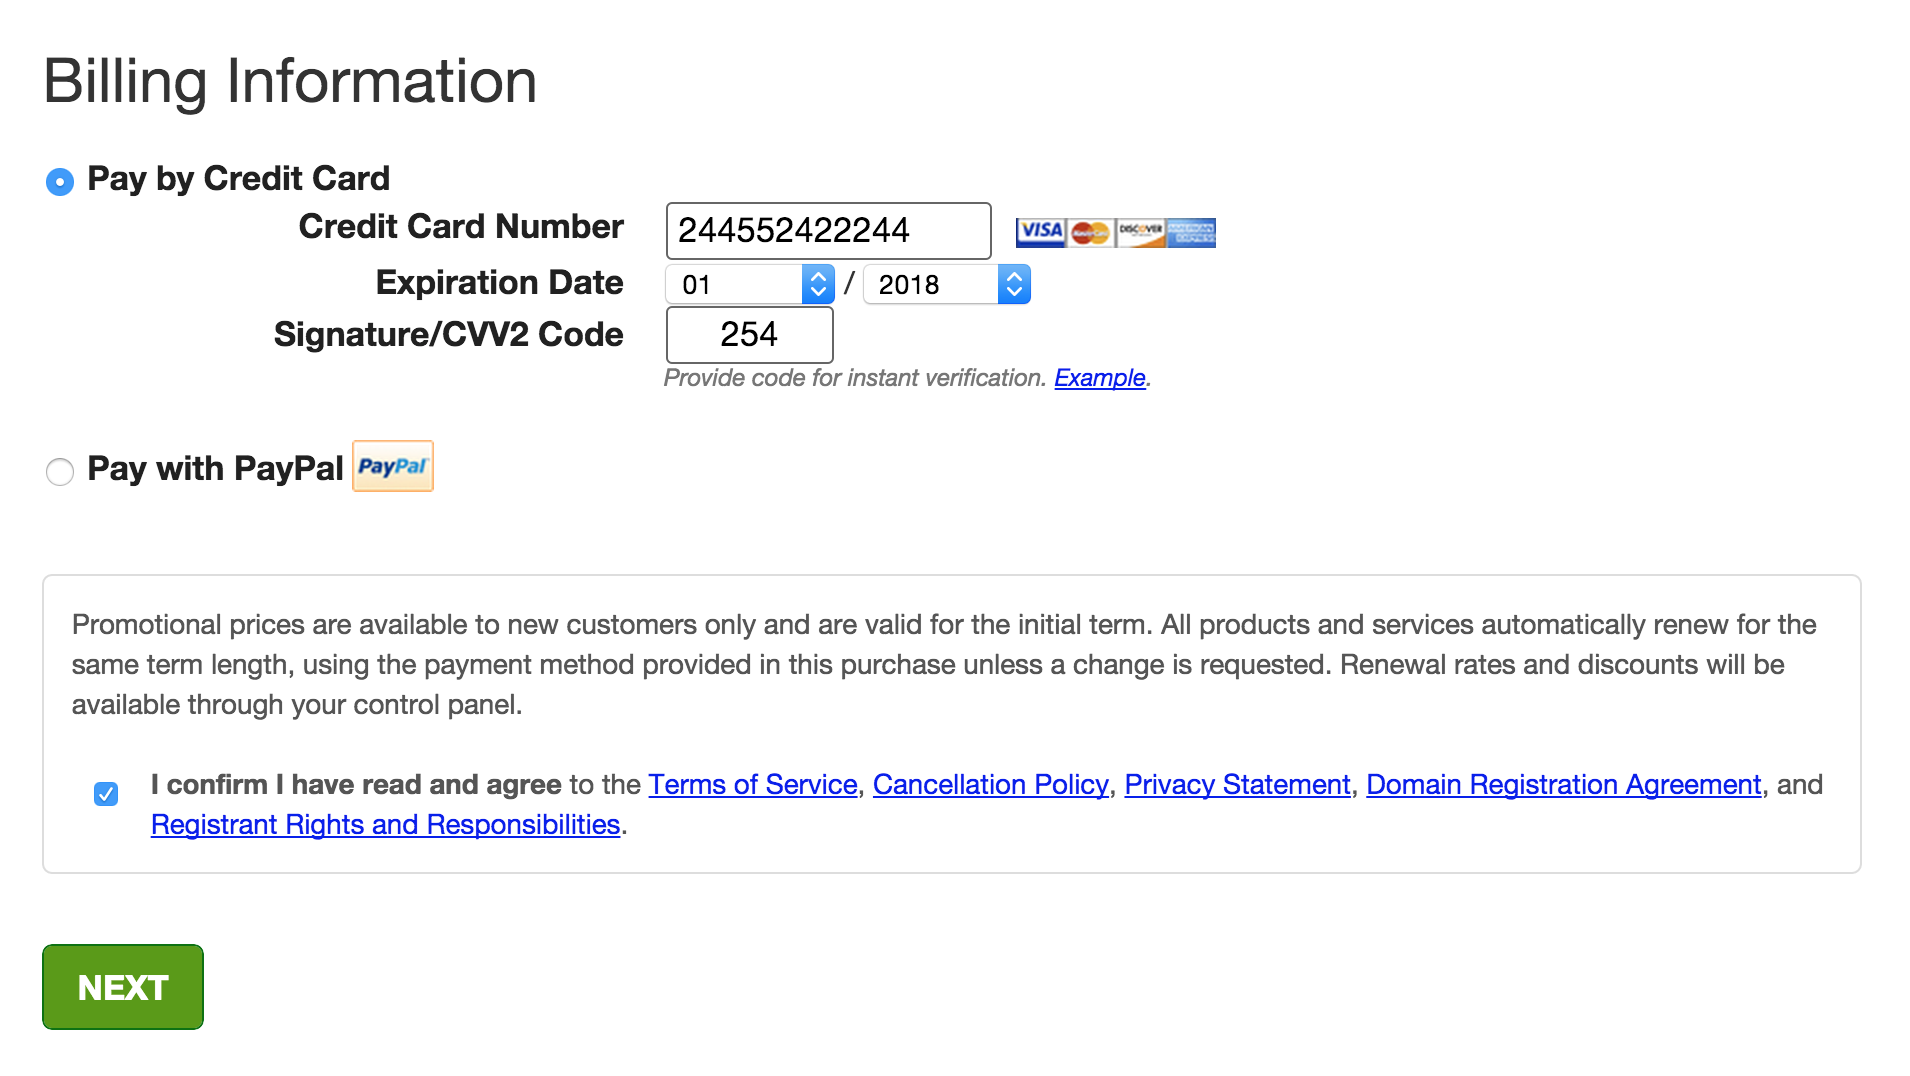
Enter your payment details and finish the confirmation of your new account with them.
Presto! You have your domain name + host!
Pay what? $36–60 bucks per year? You already saved over 100% V.S. the normal route.
You’ll get access to the CPanel backend of the server so login as soon as you get the details.
Now, congratulate yourself and let’s put up that blog of yours.
So, is starting a blog hard?
PLEASE DON’T STOP just because you need to spend money.
I was in that rut before I started.
When I finally parted with my money, that’s when I actually started making stuff happen.
If you don’t do this now, then you WON’T be able to do anything!
If not now, when? There’s no right time. Just do it.
Like I said earlier, that’s like you having a cup of coffee in McDonald’s everyday, which you are probably already doing.
Commit to this and get to work. Excuses are for the weak and you aren’t one of them.
The Setup
You are now in CPanel.
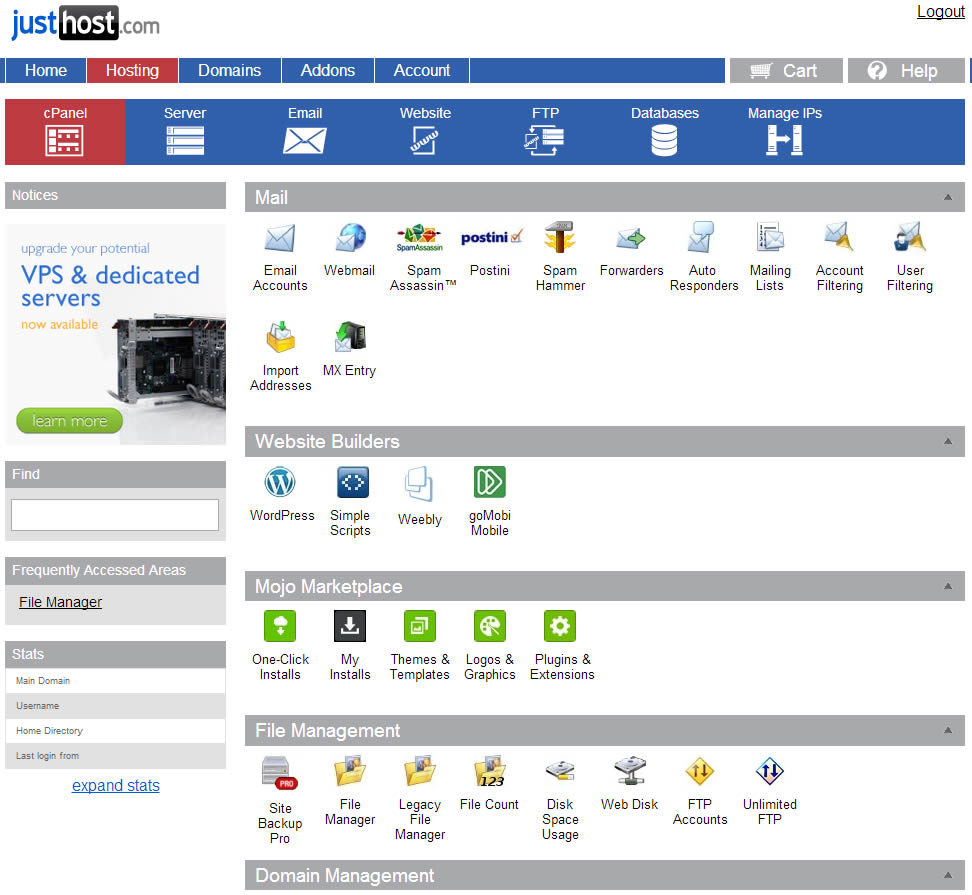
It’s time to select a CMS. A Content Management System that you will actually love to use and make it easy for you.
What is it? Let’s just say it’s software to make your life EASY.
For simplicity’s sake, let’s take WordPress because odds are, you will prefer it over the others.
- Simply click on the WordPress icon that you see there on your CPanel. It’s the circular one with the big “W” icon. It should be very easy to spot.
- Should you worry about picking a www or non-www domain? Nope. Pick what you want.
- Enter your Blog Name, Username, Email and Password. (Remember your password!!!!)
- Click the install button. It will install WordPress for you within a few seconds.
- That’s it. You are done. You now have a functioning website.
Now, this setup might be different by the time you read this because the current script is going to be updated but in the end, it’s still just about filling up some text boxes and hitting the install button.
In the new backend, you might not be asked for a username, instead, you will just use the email as the username.
That’s less than 15 minutes right?
That’s it! You now have a blog!
Load your domain name if you don’t believe me.
Let’s get started!
Now, it’s time to walk you through the EXACT steps that I do for each new WordPress site I create.
All you need to do is follow my lead and spend another 15 minutes with me to set it up.
If you follow each step, it’ll probably take 10 minutes or less but 15 sounded like a safer number.
Will you spend more money? You can, but you don’t have to.
Either way, I already helped you save over a $100. It’s up to you if you want to spend a bit more to pretty up your blog or make it more functional.
Setting Up the WordPress Backend for Basic SEO
I would like to begin with setting up the site for SEO. Why? Just so you don’t have to worry about it ever again.
Step 1. Login to WordPress
Remember your login details? I hope so! Keep that safe and only to yourself, ok? Login now!
Step 2. Update your WordPress version
Does it ask you to update? Is there a new version? Some installations are normally older versions so it’s possible that it’ll have an update available. Just update it.
The reason for this is to keep your site safe. The more updated the version, the more stable and secure it is, usually.
Step 3. On the left navigation bar, click on “Posts”
See that “Hello World” post? Hover your cursor there and “Trash” it.
Step 4. Back to the navigation bar, go to “Settings” then choose “Permalinks”
This is the area where you control what the URL will look like. Do you like seeing just random numbers in your URL? Of course not! So this is where we change it.
This can be subjective but I prefer short URLS. So I suggest using “Post Name”
So it will come out like “http://denseymour.com/seo-philippines/“ instead of “http://denseymour.com/?p=123” which is not optimized and fugly as hell.
Remember to SAVE it!
That’s basically it BUT let’s take it a few steps further.
Step 5. Install these BASIC Plugins
I’ll go over other plugins later.
For now, let’s stick with the basic ones so you can get started with blogging.
If the plugins below are not there, click “Add New”
- Akismet – Normally built in. Activate it. It will ask you to sign up. It’s free. This plugin protects you from a lot of spam comments.
- WP Sitemap Page – search for this and install it.
- WordPress SEO by Yoast – search and install. I’ll teach you how to fix this up later.
Step 6. Adding Static Pages
You often see those Disclaimer pages or Terms of Use pages on other sites, right?
You need to create them for your site as well.
This helps with SEO and for disclaimers when you start putting up ads.
But those aren’t the only static pages that your site will need.
You need these basic Static pages:
* Privacy Page
* Terms of Use
* About
* Contact Us
* Sitemap
Don’t worry, I told you it’ll take just a few minutes so here are some shortcuts!
- Go to the navigation and click on Pages -> Add New
- Create a “Privacy Policy”
- Go to http://www.bennadel.com/coldfusion/privacy-policy-generator.htm/
- Input your details
- Copy the Privacy Policy -> Paste it on the Page you are creating.
- Scroll to the bottom.
- You’ll see the “SEO Title:” Enter something like “Privacy Policy | Your Website Name” – If
it’s too long, it WILL tell you so shorten the title if needed. - Move to “Meta Description:” enter a description. It sounds stupid but it’ll optimize your site. (Note: You might be asking what this is. When you search in Google, on the results, you see the title and the description right? That’s what you just did. Other people don’t use this and end up with non-sense AND that’s why people don’t click their listings.)
- If you want to edit this page and make it more creative, do it next time.
- Publish this page. You can View it and save the URL if you want.
- Add a new page, this time, for “Terms of Use”
- When you generated the Privacy Policy, at the bottom, you will have the Terms of Use. Copy it
- Paste it and enter the Title and Description.
- Publish it. View it and save the URL if you want.
- Add a new page. This time for your “Sitemap”
- In the body, enter the shortcode given to you.
- Yes, that’s it. Then it’ll automatically update each time you add a page on the site. Clever huh?
- Add the meta title and description. Publish and view it.
- Now for the About and Contact pages. Just publish a blank “About” and “Contact” page for now.
Why? We just want to reserve those pages so you won’t forget to fill them up when you are finished setting up the site.
So that’s less than 15 minutes!
You’ve optimized your site for the most basic things.
My motto for sites? Do it right the first time.
Being optimized right from the start puts you in a GREAT advantage.
Choosing a Design
Now, do you have an extra 15 minutes? You got this far, you probably do!
It’s time to select a design for your blog.
You might take hours here but if you are a plain guy like me, then it won’t take too long.
For WordPress, we have what we call “Themes” to make the design process a breeze.
You can always customize it, which is expensive, but utilizing pre-built themes will make it easier for you as you are just starting.
I Recommend 3 Places to get themes from:
- StudioPress – This is the one I’m using on my site. If I want blogs, StudioPress’s Genesis framework IS ONE OF THE BEST themes when it comes to SEO. It’s light (no pun) and easy to set up. This will probably be the first theme Light will ever learn to use when she grows up.
- ThemeForest – For more specific looks and functions, say a hotel or a job board or for ecommerce, ThemeForest has a LOT of options. This and Genesis will set you back around $60 per theme, which isn’t bad at all!
- Free WordPress Database or you can access this on your site by going to “Appearance -> Themes” and clicking “Add New”
There are a lot of free themes but obviously, the premium paid themes will have a lot of advantages.
You can start with free themes if you want to play around with it but my recommendation will ALWAYS be Genesis, Thesis and some select ThemeForest themes.
If you have questions before buying, I could give you tips so just let me know.
You are probably excited to get started so start looking around and choose your theme right now!
Warning, give yourself a time limit. Don’t take more than 15 minutes. You just want to get started ASAP so you can start writing about what you want!
Once you Have a Theme

- Upload it in the “Appearance” area
- Activate it.
- Set it up by following their Documentation and Support Area. You paid for the theme, you have the right to ask for help from them! If it’s free, the creator will probably get back to you in a day.
So for this part, I can’t help much as each theme is different.
The good part is that they have their own documentations included in the download. Follow them. Spend time setting it up and following their instructions.
Blogs, in general, will have less setup time.
Genesis + Child Themes are practically “plug and play”. Minimal setup needed. 1 hour is already a lot.
E-commerce sites will obviously take longer as you still need to compile those product photos and creating descriptions and content.
Total Time Breakdown
- Basic Setup and Optimization -> 15 minutes
- You, Deciding for a Design -> 5 to 30 minutes to 20 hours LOL
- You, Setting up the Site-> 15 minutes to 4 hours
I hope you can finish setting up the site today! Take an hour to do that part, at least.
At this point, you’ve earned a break.
Get up and walk around. Come back later, tomorrow or you can start right now. It’s up to you.
Next up? I’ll help you set up the rest of the site, optimize it further and how to back it up.
Don’t be too stressed with it.
Things will be fine so don’t worry. It’ll become easier as you continue to get comfortable with the WordPress platform.
It’s actually much easier nowadays. It used to take me 3 hours to fully setup a site back then.
Designing was another 5+ hours!!??! Way back then, it took me weeks!
Now you have everything and it’s even cheaper, so keep at it. This is like making a cup of coffee with a coffee maker. It’s practically instant.
If you want to procrastinate, DON’T!
DO THIS NOW.
Take 20 minutes WITH ME for this part and I will walk you through.
Nobody is going to walk you by the hand like this unless you pay them hundreds of $ per hour.
All you need to do is actually take the action. JUST DO IT!
Stop saying that you can’t do it and it’s complicated. I taught my mom to do it.
I taught my wife, who was nowhere near knowing anything about websites, to create an awesome site and she’s enjoying every minute of her blog now.
YOU CAN DO IT, TOO.
Shining Up Your Blog. Some New WordPress Plugins!
Possibly the biggest advantage of the WordPress platform is that it has a WIDE selection of plugins.
Plugins make your life easier. It used to take a lot of coding, customization and weeks of work just to finish a single function for a website.
Today, you just need to search for a plugin and install it. WTF? (oops, baby language only)
Let’s get down to business.
I’ll walk you through the most important plugins that will actually HELP you.
The thing is, the less plugins you have, the better and faster your site loads so I will be sticking with the bare basic set.
It’s up to you to add new, functional plugins that will fit the goals of your site.
Say you need a pretty plugin for your author box because you really want to showcase authors, then you need to install a plugin like Fanciest Author Plugin. It’s what we use here on Light’s blog.
A plugin like that is not essential, but it’s pretty useful and I actually use it on most of my blogs.
So again,the basic way to install a plugin is to:
- Login to your WordPress Dashboard.
- On the left navigation menu, you can see “Plugins” there.
- If you click on that, you can see the currently activated plugins.
- You did this already earlier. So you will see AT LEAST 3 plugins there.
- The reason I wanted to get those 3 activated yesterday was to make sure they are in place already just in case you delay working on your blog for days or weeks.
The 3 Plugins I Recommended
Plugin 1 – Akismet
Set it up by signing up for a Key. If it’s a new install, there should be a warning at the top of the page about it.
You can easily set it up by following it’s directions. It’s a free service.
Plugin 2 – Yoast SEO for WordPress
This one will take a lot more understanding to do BUT I will walk you through each step easily. IF you don’t want to understand what each thing is for, then just follow each step that I’ll be discussing.
Step 1. Dashboard
The only important thing here is Google Webmaster Tools. There’s a link there, click it. Process your account.
Once in, add your website in Google Webmaster Tools. It will ask you to Verify your site. All you need to do is use the alternate method. Use HTML Tag.
Copy that and enter that tag in your Yoast SEO Google Webmaster Tools text box.
For the rest, just do them when you have the spare time.
Pinterest is there to verify your business account. Alexa can be set up with a free account.
Yandex and Bing have their own Webmaster tools so they can be set up similarly with Google’s.
Step 2. Titles & Metas
“General” Tab
- Check Force Rewrite Titles
- Check Noindex subpages of archives
- Check Add noodp meta robots tag sitewide
- CheckAdd noydir meta robots tag sitewide
“Home” Tab
- Title Template – Enter your Title here. This is your site’s name.
On Google, when you do a search, you see the bolded blue title right? That’s the title. Limit it to 60 Characters. - Meta Description Template – Enter your description here. On Google, that’s the description below the title.
Limit this to 150 characters.
Note: Sometimes, you can’t use this part. It depends on your theme. The theme will let you edit a certain page, and you can enter the title and description there.
“Post Types” Tab
- No need to touch this for now.
“Taxonomies” Tab
- Go to Tags.
- Check “Noindex, Follow”
“Other” Tab
- For both Author Archives and Date Archives
Check both – Noindex, follow & Disable the author archives - Save Changes
Step 3. Social
- If you already have your Google+, Twitter and Facebook pages, enter them in these tabs.
- If not, you can skip this for now and come back later when you have those set up already.
- Be sure to fill up everything and check all the checkboxes when you have filled up everything.
- Twitter – be sure to click the “Twitter Card Validator” and request for your card to be validated. It won’t take longer than 1 minute.
Step 4. XML Sitemap
- Check the box if it’s not yet checked
- Click the button
- It will open a “www.yourdomain.com/sitemap_index.xml” page
- Go to your Google Webmaster Tools
- Click your website
- On the right side, click on “Sitemap”
- On the upper right, add your sitemap “sitemap_index.xml”
- Just to be sure, add the pages on “sitemap_index.xml” as well on Webmaster tools
Step 5. Permalinks
- Check Remove the ?replytocom variables
- The rest are optional. So just save.
Step 6. Internal Links
Optional. Some themes will he breadcrumbs already.
If you choose to use this:
- Enable Breadcrumbs (Check this)
- Enter text on the following boxes.
Separator between breadcrumbs: use a dash or a “>”
- Anchor text for the Homepage: Name of your site or juse “Home”
- Prefix for the breadcrumb path: You Are Here:
- Prefix for Archive breadcrumbs: Archives For:
- Prefix for Search Page breadcrumbs: You Searched For:
- Breadcrumb for 404 Page: Page Not Found…
This basically shows a person where they are:
Example: Home > You Are Here:
You’ve probably seen those on other sites. It’s just GOOD for SEO.
3. Save
That’s it. Follow the setup I recommend and you will breeze through
this part where people normally take hours to setup or make sense of.
Plugin 3 – WP Sitemap Page
You already set this up yesterday. It’s just for one page. Just so you have a Sitemap Page.
This will come into play again in tomorrow’s email lesson because we will need to put that Sitemap Page somewhere on the site so it’s visible.
Now it’s time for new plugins.
Plugin 4 – iThemes Security (Free)
Nothing is more important than security and it’s vital to secure your site early.
As with all software, there will always be people that want to exploit it.
Protect your WordPress installation by using this plugin.
It’s pretty self explanatory. It will run you through some things that you need to secure.
All you need to do is to actually click on buttons and confirm that you want something fixed.
If something is not clear, you can ask their support team or even me.
Plugin 5 – BackupBuddy (Paid)
Of course, if you secure your site, things CAN still develop and that you might suddenly lose your blog.
I’m not scaring you, but shit happens.
To protect yourself, you need to have a backup of your site and that backup should be securely stored automatically somewhere.
It should also be EASY as hell to put back up.
This is the second iThemes product I’m recommending. I’ve been with them since they started and they have never let me down.
Plugin 6 – SumoMe (Free for most modules)
This is a new plugin but it’s a lot of plugins in one and it’s simple as hell to use.
It quickly became a staple in all my sites.
Step 1. Install it
Step 2. Go to your site’s homepage. On the upper right side of the screen, you will see a blue crown. Click on that.
Step 3. Signup
Step 4. Open the Sumo Store
Step 5. You will have an abundance of options.
- Image Sharer – for sharing images on your site. Pretty handy.
- Highlighter – this is when your reader highlights your text. A box will pop up and they can share it out.
- Share – this is the plugin you want to activate to have your social buttons show up.
For email list building, you can use all their tools at the same time.
It’s all pretty good but you will need an autoresponder service, which we will get into on a future email.
The rest of their tools are for tracking like HeatMaps and Content Analytics.
All of them have their own uses. It’s up to you if you want to implement them
So with those 6 plugins, your site is optimized, secure, backedup, can be easily shared through social media and can collect data from your customers.
You probably spent around 15 minutes TOPS installing and setting those up.
You can choose to continue with the plugins below or you can jump back to tweaking your site design.
I would recommend that you at least take a look at the following recommended plugins.
The Email List Building Plugins ARE ALSO very important if you want to start collecting emails.
Optional Plugins:
These are the plugins I recommend. Some are free, some are paid.
I’ve used them all on different blogs over the years and they stood the test of time, which is the only reason why I am recommending them.
All the Free plugins can be added right from your Dashboard.
Before continuing, I just want to say that I am proud of you.
You got to this point and you want to continue making your site better.
Since you are new, you don’t really have to do these now. Just bookmark this page (share it on social media if you can) and come back at a later time.
You should start creating your content on your brand new blog to get the ball rolling.
For those that want to continue, let’s go!
Why choose Paid plugins?
- They are prettier
- They make you memorable
- They have more functions
My take, purchase only those that you need.
The main thing with these plugins is the “Support” behind them. If the support offered is BAD then it’s a sign to stay away.
Stat Plugins
A. Jetpack by WordPress.com (FREE)
The only reason why I would recommend this is because of the stats. It gives you a quick view of your daily page views.
I’m lazy when it comes to checking my Analytics daily so looking at the stats using this plugin makes it easier to gauge your improvements.
- Activate Jetpack
- Follow Instructions
- Login or register a WordPress.com account.
- You’re good to go.
B. Google Analytics Dashboard for WP (FREE)
- You need to track your stats using Google Analytics. Go to http://www.google.com/analytics/ and login.
- Follow the instructions that Google Analytics Dashboard for WP will give you.
You can have both plugins installed at the same time. It’s no problem.
Email List Building Plugins:
Ever noticed that when you signed up to a newsletter, you always get an email back automatically? That’s called an autoresponder.
The one I use is GetResponse. I’ve BEEN WITH THEM for over 8 years now. I trust them a lot.
I could mention other companies but as I have been with GetResponse for soooo long, I have never tried out the others nor will I want to.
I CAN’T really recommend those that I haven’t tried.
Anyway, in order to make your website or blog long term, you need to collect emails.
I’m not talking about getting people to subscribe to your Feed or use Feedburner. I’m actually talking about getting them to sign up for your newsletter.
This is where you nurture your “list” of subscribers, give them what they want, help them and eventually, you can recommend products.
- OptinSkin (Paid) – MY go-to optin plugin for most sites I run. It has everything ready.
- PopUp Domination (Paid) – My old sites still run this. It’s pretty good with a LOT of free designs. http://denseymour.com/popupdomination
- SumoMe (Free)
- LeadPages (Paid) – If the world will end tomorrow and I had to choose one, I’ll pick LeadPages.
- OptinMonster (Paid) – Very good pop up and customizability. Still use it on LeapFroggr’s SEO blog.
Editorial Calendar Plugins:
IF you want to plan out your content then you need a calendar. These plugins will make it easy for you.
- Editorial Calendar (Free) – Simple and light weight. Good if you want to focus on just your blog’s content.
- CoSchedule (Paid, with a Very Long Free Trial) – This is what I use. It’s pretty amazing. I can plan my content ahead of time. Assign my writers and editor tasks within it and schedule social messages out in advanced. It even works with Buffer.
Advanced SEO Plugins
- Schema Creator by Raven (Free) – Markups are GREAT for SEO. If you are running a business, odds are,
you will have an address, phone numbers, products, etc. Using this plugin will make adding markups easy. - In Depth Articles Generator (Free) – Notice the in-depth articles area when using Google search? You can get there too in the future when your site has enough trust with Google. So use this “just in case”
- LeapFroggr’s Custom Schema Plugin – This is our first try with creating plugins. We got this idea from the LeapFroggr community and went ahead and made it happen. It’ll make adding schema a breeze.
Speed Up/Cache Plugins
- W3 Total Cache (Free)
- WP-Rocket (Paid) – My go to cache plugin. Set and forget.
Contact Form Plugins
- SumoMe (Free)
- Zopim (Free or Paid) – Also has live chat. If that’s vital for your business, use Zopim.
- cforms (Free)
- Contact 7 (Free)
- LeadPages (Paid) – I can’t say enough for this service.
Comment Related Plugins
- CommentLuv (Free or Paid) – People that leave comments will have the option to leave a link back to their site. It encourages comments as well.
- Disqus (Free) – This will transform your whole comments area. It will limit spam comment a LOT. The only gripe is that people will leave less comments.
- GASP (Free) – Install this to limit the spam you get. It goes great with Akismet.
For social sharing, I use SumoMe and Ultimate Social Deux. I would just recommend SumoMe for simplicity’s sake but if you want to be different, check the other one out. There are other cool plugins there as well.
Whew! We’re done with plugins now!
Your site is primed and ready to get organic traffic from search engines like Google.
It’s now also very easy to share your website around in social media!
If you have questions with them, just let me know.
Just Some Notes:
- Each Page or Post you add will show Yoast’s SEO area at the bottom.
- Fill up the Title
- Fill up the Description
- Make sure they fall within the character limit. Don’t be too short. Don’t be lazy and just put 5 words there.
- You DON’T really need to look at the other options there, like the focus keyword.
- You can add information for the social tab if you are partially O.C. like me. This will give Facebook a set description when people share your link on Facebook.
- For the pages we will do today and the pages you finished the past couple of days, be sure to go back and edit them. ADD in the description and titles. Who will read them? Google will. So do it today.
Bonus: The Other Static Pages:
The typical important pages on a site:
- About page
- Contact page
- Privacy
- Terms
- Sitemap
Note: Be sure to use “Page” and not “Post”
As you already finished #3–5 then you should start putting content on your About and Contact pages now.
Step 1: About Page
- Create “a new page”
- It’s easy to set up your about page. Tell your story. Make them care.
- Add some witty photos and your motto. Introduce yourself to the world.
- Fill out the Yoast SEO area (Title and Description)
- Publish It
Step 2: Contact Page
- Create “a new page”
- You might have added a contact plugin earlier, so follow their instructions
- IF you installed the Jetpack plugin, then you will see a “Add Contact Form” beside the “Add Media” button when you create a new page.
- Enter the details you need, like Name/Email/Website/Message
- Edit where it will send the email to (enter your email)
- Save the form
- Enter some text to spice up your contact page
- Fill out the Yoast SEO area (Title and Description)
- Publish It
For more advanced forms, check out the Contact Plugins I suggested in the plugins section.
Menu Navigation:
See those navigation links with drop downs at the top of a blog you like?
It gets you around their site. It let’s you find important pages.
Most themes will already have this in their tutorials.
But if you opted to use a free theme, they probably won’t have a tutorial area.
So here’s what you need to do.
- Go to Appearance
- Click on Menus
- On this page, click “create a new menu”
- Name it and save it.
- From the left, you can see Pages, Links, Categories.
- Now, you can start adding navigation links for your menu
- Say you want your readers to find a way to get back to your Homepage, then select Pages > View All > Home
- Click on Add to Menu
- Home will popup on the right side.
- Repeat this, by adding your About page, your Contact page, a couple categories or whatever you want to show. Tip: Stick with helping your readers to find important areas of the site.
- You can drag to reorder them
- You can drag it under another menu item to make it a sub menu link. This will usually show a dropdown when you look at your site
- Be sure to Save the menu
- Load your homepage, see how it looks
- If it doesn’t show, maybe your theme does not use Navigation Menus. It may also mean that the theme you used only allows the menu on a certain area, like the Widget area.
Do You Need a Blog?
Note: This is for the non-bloggers. This is for people that followed this tutorial but just wanted to put up a website for their business. I don’t know why, since this is about “starting a blog” but it works for anybody so that’s a way to tell me that I did a good job explaining.
Anyway, let’s say you are a business owner that just wanted to put up a website?
Why would you need a blog, right?
Well, you have a lot of business sites out there that don’t have blogs, but you know what’s happening now?
They are losing out on a lot of traffic. They are losing to bloggers. They are losing to their competitors.
All because they refused to create new content and stuck with a plain old, “business card” website.
So, to break it down:
- SEO Benefits -> New content = Better visibility in the search results.
- Social Media Exposure -> Why would your target market share your brand to their friends? Because they liked your site? Your product? Do you seriously believe that? You have to give them a good reason. A good, entertaining, relevant, up-to-date reason. See those articles on your Facebook feed? That’s what they are doing. It got shared to you. Why not do that for you business and get even more people to see your stuff?
- Conversions -> They are more exposed to your brand. Nobody really buys on the first look. Ooops, “almost nobody” buys on the first look. It might take them 5–6 times just to eventually buy from you. You keep being infront of them and when the time is right, they will buy from you when they need your product or even recommend it when people ask about it.
- A lot more you don’t have to concern yourself with.
Obviously, you need to invest time and/or money for this but sometimes, you can some shortcuts, like featuring other advocates.
They can create the content for you for free. It’s awesome like that.
So do you need a blog? Of course, but not if you can’t handle it.
We can help though, if you want us to.
BOOM!
Your blog is now a fully working, optimized website, ready to get leads and readers.
Isn’t it wonderful that you decided to take action??
You followed the steps, created a COOL site and a way to get people to find you!
So, what’s next?
Well, we can talk about traffic strategies, because let’s face it, what’s the use of your site if you can’t get people to it?
6 Traffic Strategies Even My Mom Can Do
1. Research First then Create Kickass Content
You need to fill up your blog first to show people that you actually know
what you are talking about. You need to be the expert in YOUR field.
Start doing some research of what people need to know or learn about before they purchase your product or service.
To be specific, answer a question that your potential client will want to know about before they make the purchase.
To take it a bit further, what do they ask or think about BEFORE they get to the question they want to solve so they can become your customer.
Example:
- You sell coffee beans
- Your clients normally would like to know the different types of coffee beans and their tastes so you can create blog post to answer THAT question.
- Taking it further, what do they encounter before they think about coffee beans? They think about IF it could save them money if they roast or brew coffee at home.
I could talk about keyword research and other technical jargon here but I don’t have to.
You are starting with writing, it’s important that you do the manual research first.
You can learn keyword research after to implement things better for SEO.
2. Blog Commenting
This is simple. Find blogs that are related to your site.
For example: IF you are a business about marketing, then comment on blogs that talk about blogging because they also need marketing. Comment on blogs that talk about technical SEO. Comment on blogs that do case studies on market segmentation.
Find vertical topics and comment on them.
The KEY is to build relationships. People will naturally refer to you and link to you.
Seriously. Leave genuine comments on other blogs. That’s how you do it. Don’t leave worthless, generic comments. Contribute to the conversations.
And the name that you use? Don’t ever leave a name using your keyword. Your IP will get blacklisted.
Why would you leave comments on other blogs? Aren’t they competitors?
The world is big. You don’t have to worry about competitors every single time. There are millions of blogs out there.
Be strategic on where you leave your comments. If you really hate the guy, then don’t comment. It’s that simple.
But as with offline networking, the currency is about how much you genuinely help other people.
You get, what you give.
3. Guest Blogging
After publishing around 5 long posts on your blog, you probably have enough experience with writing.
Start looking for authority websites. Look for blogs that talk about your market.
Find out where your readers are hanging out online.
List them down and start contacting them about guest posting opportunities.
Normally, you should offer a topic but it depends on their guidelines.
They might be the one to offer you a topic.
For personal blogs, connect with them through social media. Comment on their posts. Just build a relationship with them.
You can then pitch to them about a guest post.
A blog will always welcome great content. It’s what keeps them alive.
As a result, you get visibility from their readers.
You get a link back to your site. You can get new email subscribers and so much more!
This is actually one of the best ways to increase your traffic fast!
4. Relationship Building with Authority Figures
I touched up on this above. You need to communicate with the authorities in your space.
Let’s stick with the coffee example. You sell coffee. Who would people normally ask or seek buying guidance from? Coffee experts!
If you got recommendations from them? You could post it on your site. You could show testimonials. You could show live tweets. Everything is possible.
The end result? Higher trust from your potential buyers which leads to better sales.
Strike up a conversation with them on social media while you also comment on their blogs. That’s the best way to get their attention. Once you do, drop them an email. Talk to them. Be personal. Introduce yourself and show them that you are really devoted to this niche.
The next step is your decision. You can get a guest post on their site and get visibility from their traffic! If you set up an autoresponder like I mentioned the other day, then you could send them to your site for them to sign up. Instant targeted subscribers!
You can ask them for recommendations. You can ask them to test your product.
You have a lot of options. Just put in the work to get to know someone.
5. Community Development
You have a LOT of options here. You can start with Facebook. Build a page and grow it. Sometimes, a Facebook group is also very good.
You can start a community on Google+. It can also be done by creating a forum area on your site. You might even want to consider your email list as a community!
You might also want to start with videos and build a following there on Youtube.
Whatever way you choose, be sure you are building the community. Show them you care.
As there are multiple ways you can do this, my example here would be using Facebook:
- Create a page
- Invite your friends
- Invite influencers
- Find forums, Q and A sites like Yahoo Answers and blogs that have people asking questions about your topic. Search on Twitter, Quora, Google+. Inform them about your group.
- Use Facebook ads and target your demographics
- Start preaching about what you know on your FB page
- Ask for their help to share it.
- Share your page to your email list, social pages and create a blog post about it
- Maintain the communication with your community.
PS. You can substitute your Facebook page with a Facebook Group. It’s more efficient since people can interact better and the posts will always notify the members unlike “Page” content where it will be shown a just a small amount of “Likers” unless you pay, that is.
6. Events!
Believe it or not, your friends, family and the people you network with offline (conferences, partners, seminars, meetups)
Join these events. Introduce yourself to people. Give them a memorable business card.
Reach out to them on LinkedIN and other social platforms they are on. You now have new connections that can help you build traffic back to your site.
Recommended Further Reading:
A lot of other GREAT Bloggers and Resources
I’ve gotten the chance to meet a lot of people over the past few months.
These awesome women (bloggers) stood out and are inspirations. If they can’t inspire you to jump in and take action to create your blog, then I don’t know what will.
- If you read blogs, then there’s a good chance that you already saw Harleena. Check her work and community over at Aha Now
- I read only 1 food blog and Lindsay from Pinch of Yum can’t seem to do anything wrong to get me unhooked. Crazy good recipes and content!
- Carol just owns it each time she publishes something on her blog and she’s like the coolest grandma I know.
- Catherine is just one of the most wonderful people you’ll get to meet online. She writes and blogs about things that will help you out with your own blogging journey as well!
- Ana is like a God-send to me. She does weekly recaps of the best news in marketing and shares it out to the world. Lazy people like me, benefit from it and I feel awful now right after I said that…
- Kelli will inspire you to do great things with her blog. If you need a lift, then check out what she’s doing! Oh, she travels and lives anywhere she wants to.
- Sue is dishing out some of the best content in the blogosphere recently. I’m just blown away!
- I have no idea how Brittany manages multiple blogs but I salute you. Crazy good and FUN. You won’t get bored reading her stuff.
- Michelle is like my idol. She gives advice on how I can actually save more money. I’ve been reading her stuff for a while now so you should check it out as well. She blogs about a great topic so that should inspire you to write on a topic you love.
- When you see Harleena, chances are, you’ve seen Adrienne as well. She is the queen of engagement and crazy good at what she does!
At LeapFroggr, we have some content to start you off to build that traffic
Crash Course to Email Marketing
All of those AND A LOT MORE articles specifically for new bloggers/business owners can be found here so be sure to sign up to our newsletter and get our free Digital Marketing eBook.
Whew! That’s really it.
This got a tad long at almost 9000 words so I apologize.
I do hope it accomplished it’s goal, which is to get you to start your blog and hopefully, YOU DID.
The fun part starts now. Go create your content and get to blogging!
Hi, Dennis,
You AMAZE me! What an incredibly thorough guide on starting a blog, you did a fantastic job. Another site? Totally impressed that you can get it all done, that’s fantastic!
Thank you so much for the mention, I really appreciate it.
Certainly wishing you all the best with your site here, and hope you have a wonderful weekend.
Thanks again,
˜Carol
Hey Carol!
I’m just filling it up a little. This is my daughter’s blog so I’d like it to have some content at least before she takes over years from now LOL! 😀
Im sure you get a lot of natural links like this just because you are the coolest! Keep rockin’!